25 posts tagged with "self-hosting"

View all tags
intermediatePart 10

Give each MCP tool its own scope, and return a refusal the client can act on

· 12 min read
Rafael Fernandes
NLP Engineer & Tech Writer at WiLine
Share:
authentik+Model Context Protocol

Part 6 put required_scopes=["mcp:invoke"] on the JWT verifier and called the server authorised. It is, in the sense that an unauthenticated caller gets nothing. It is not, in the sense that matters: mcp:invoke opens every tool on the server. The same token that lets an agent run find_customer lets it run issue_refund.

That is the whole gap. A read-only agent and a refund-issuing agent hold identical credentials, and the only thing standing between "look up Maria" and "refund invoice 2" is that nobody asked.

This post closes it, badly first and then properly, because the badly is what most people ship and the difference only shows up in what the client can do about a refusal.

Both versions refuse the same call — a read-only token asking for issue_refund. They differ in where the scope is checked, and that one choice decides what the client gets back:

Prerequisites​

Parts 5 and 6, specifically:

  • Authentik issuing client-credentials tokens to an agent-tools provider (part 5)
  • A FastMCP server verifying those tokens against the JWKS endpoint (part 6)
  • ~/mcp-auth/token.sh, which takes a scope string and returns an access token

Part 6's server stays on :8770 throughout. The two versions below run on :8771 and :8772 so you can compare all three without stopping anything.

Step 1 — Two new scopes​

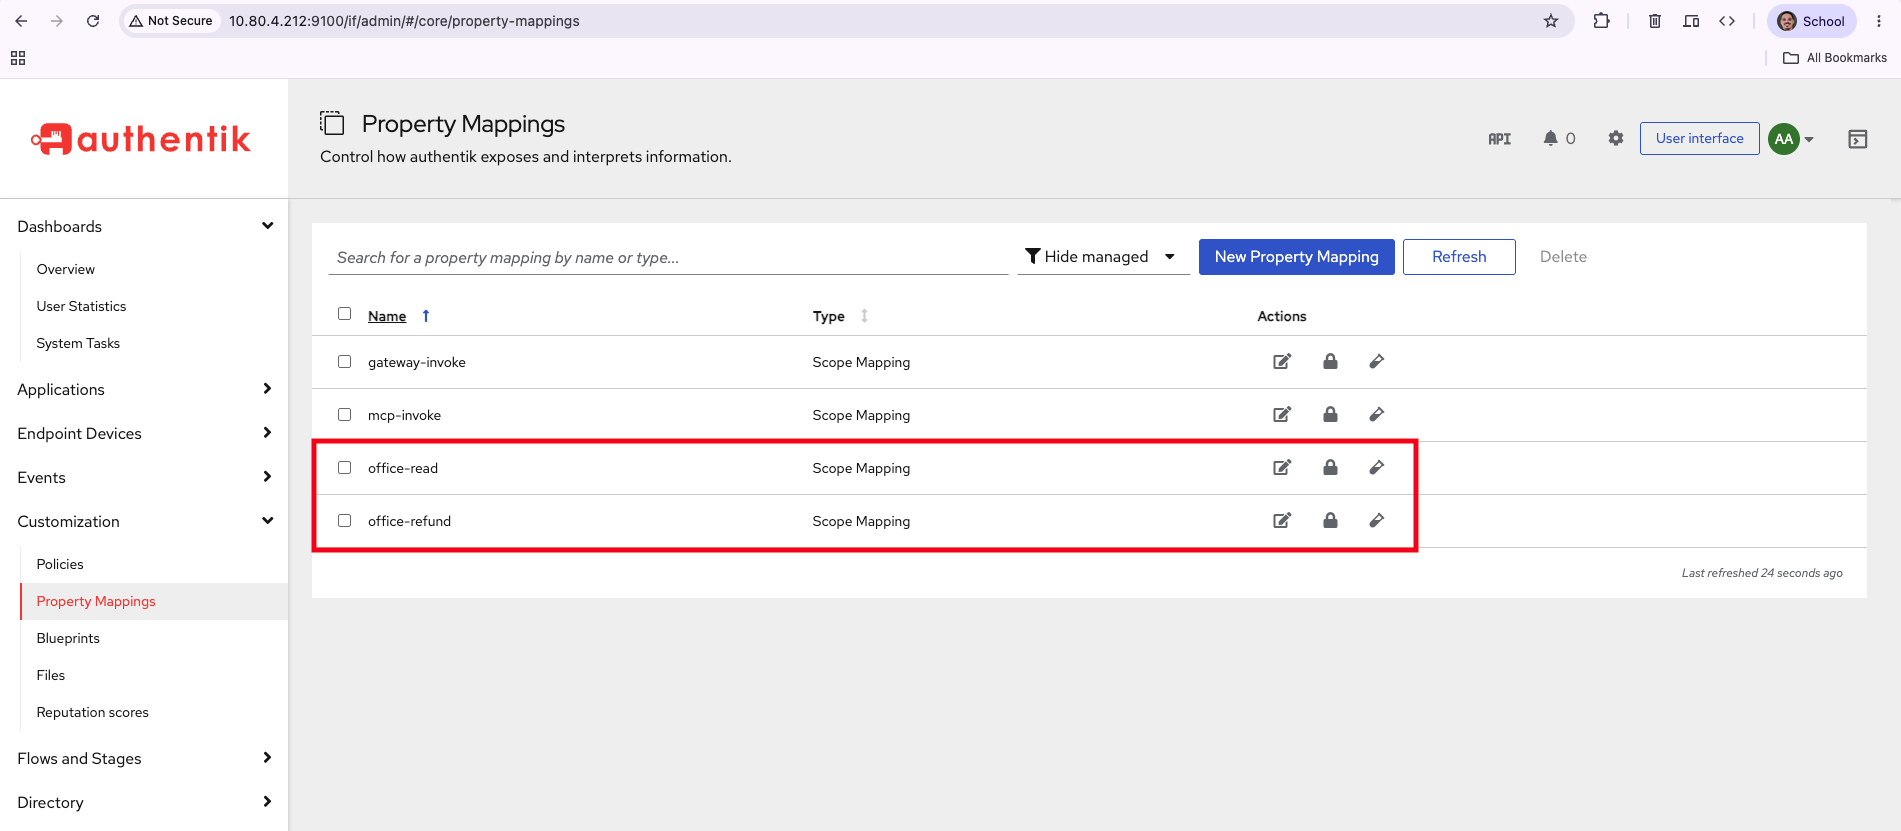
Scopes are Property Mappings in Authentik. Customization → Property Mappings → New Property Mapping → Scope Mapping, twice:

NameScope nameDescription
office-readoffice:readLook up customers and invoices
office-refundoffice:refundIssue refunds

Two new scope mappings alongside the existing gateway-invoke and mcp-invoke

Creating them is not enough. A provider will only issue a scope it has been given, so open Applications → Providers → agent-tools → Edit and move both into Selected Scopes.
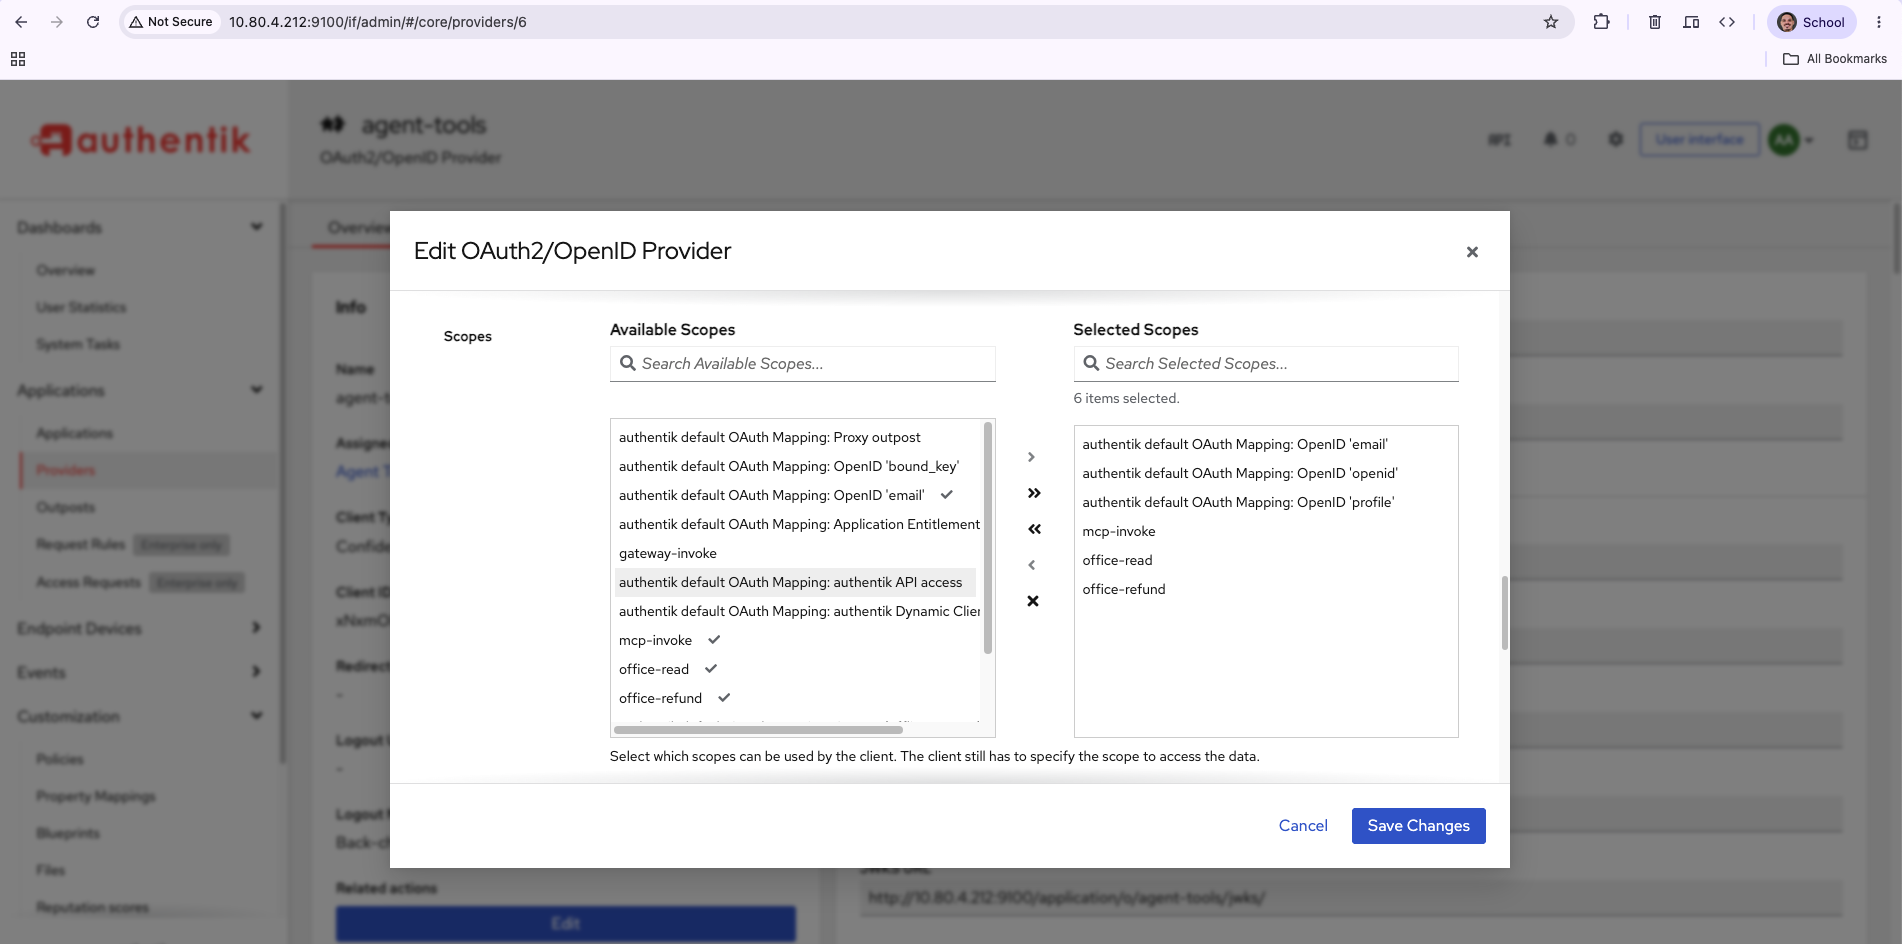
The agent-tools provider with mcp-invoke, office-read and office-refund selected

Note the line under the picker: "Select which scopes can be used by the client. The client still has to specify the scope to access the data." Both halves matter. Selecting a scope here does not put it in every token — it permits the client to ask. A client that asks for nothing gets nothing, which is why every token.sh call below passes an explicit scope string.

Confirm the token actually carries what you asked for:

~/mcp-auth/token.sh "mcp:invoke office:read" \
| cut -d. -f2 | base64 -d 2>/dev/null | jq .scope
"mcp:invoke office:read"

If that comes back without office:read, the scope is not on the provider — fix that before writing any server code, or you will spend an hour debugging enforcement that is working correctly on a token that was never scoped.

Step 2 — The obvious implementation​

Keep required_scopes=["mcp:invoke"] on the verifier as the price of admission, then ask per tool whether the caller holds what that operation needs. FastMCP exposes the verified token through get_access_token(), so a decorator can read the claims the verifier already checked:

from fastmcp.exceptions import ToolError
from fastmcp.server.dependencies import get_access_token

def requires(scope: str):
def decorate(fn):
@functools.wraps(fn)
async def wrapper(*args, **kwargs):
token = get_access_token()
held = set(getattr(token, "scopes", None) or [])
if scope not in held:
raise ToolError(
f'insufficient_scope: this tool requires "{scope}"; '
f'token carries {sorted(held) or "nothing"}'
)
return await fn(*args, **kwargs)
return wrapper
return decorate

Then one line per tool:

@mcp.tool
@requires("office:read")
async def find_customer(query: str) -> list[dict]: ...

@mcp.tool
@requires("office:refund")
async def issue_refund(invoice_id: int) -> str: ...

Run it on :8771 and drive both tools with both tokens:
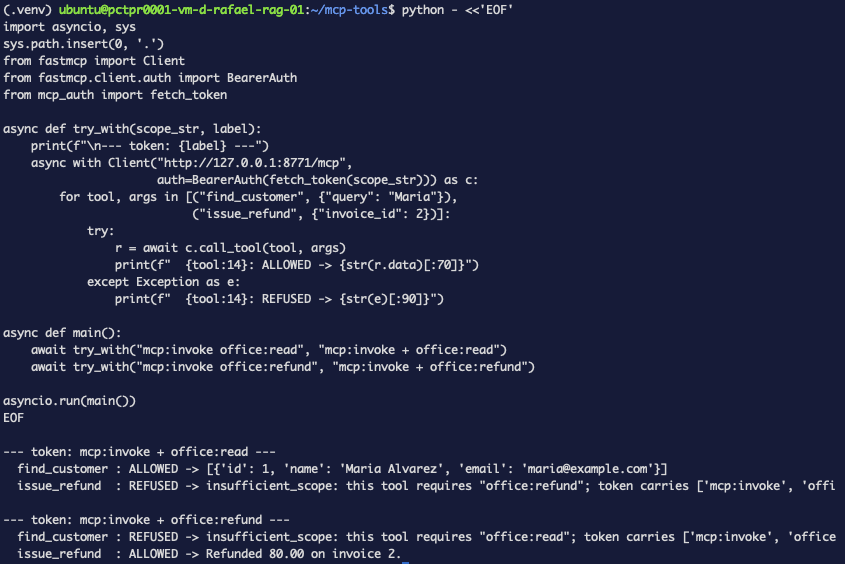
Two tokens, two tools: each token allows one and refuses the other

--- token: mcp:invoke + office:read ---
find_customer : ALLOWED -> [{'id': 1, 'name': 'Maria Alvarez', ...}]
issue_refund : REFUSED -> insufficient_scope: this tool requires "office:refund"

--- token: mcp:invoke + office:refund ---
find_customer : REFUSED -> insufficient_scope: this tool requires "office:read"
issue_refund : ALLOWED -> Refunded 80.00 on invoice 2.

That is real enforcement. The refund token cannot read, the read token cannot refund, and the refusal names the missing scope. For a lot of deployments this is where you stop.

Step 3 — Why that refusal is not good enough​

Watch the HTTP layer rather than the client library.

TOK=$(~/mcp-auth/token.sh "mcp:invoke office:read")
curl -sS -i -X POST http://127.0.0.1:8771/mcp \
-H "Authorization: Bearer $TOK" \
-H "Content-Type: application/json" \
-H "Accept: application/json, text/event-stream" \
-d '{"jsonrpc":"2.0","id":1,"method":"tools/call","params":{"name":"issue_refund","arguments":{"invoice_id":2}}}'
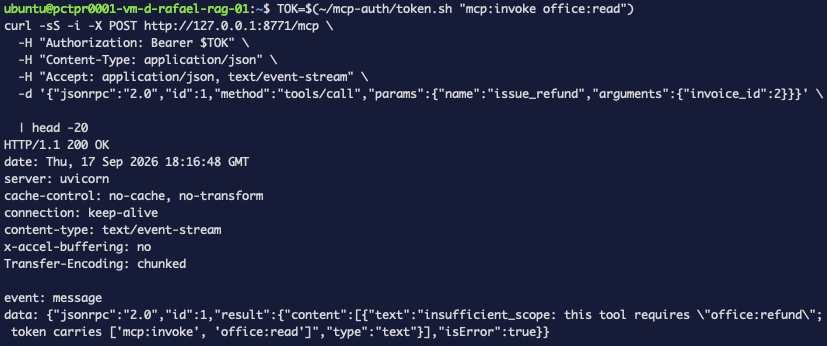
The tool-body check returns HTTP 200 with the refusal inside the body

HTTP/1.1 200 OK
content-type: text/event-stream

data: {"jsonrpc":"2.0","id":1,"result":{"content":[{"text":"insufficient_scope: this tool
requires \"office:refund\"; token carries ['mcp:invoke', 'office:read']","type":"text"},
"isError":true}}

HTTP 200. The request succeeded; the tool declined. That is correct JSON-RPC semantics and it is useless to an OAuth client.

An OAuth client that wants to step up — go back to the authorization server and ask for office:refund — is watching for a 401 or 403 with a WWW-Authenticate header telling it what to request. It does not parse English out of a tool result. So the refusal is legible to a human reading logs and invisible to the machinery designed to handle exactly this case.

It also arrives late. The tool body runs after routing, after session setup, after the server has committed to a successful response. By then there is no status line left to change.

Step 4 — The challenge the spec actually wants​

Getting a 403 means checking scopes before the JSON-RPC layer answers, which means ASGI middleware wrapping the FastMCP app:

class ScopeChallengeMiddleware:
def __init__(self, app):
self.app = app

async def __call__(self, scope, receive, send):
if scope["type"] != "http" or scope["method"] != "POST":
return await self.app(scope, receive, send)

# Buffer the body so we can inspect it and still pass it on.
chunks, more = [], True
while more:
msg = await receive()
chunks.append(msg.get("body", b""))
more = msg.get("more_body", False)
body = b"".join(chunks)

needed = None
try:
rpc = json.loads(body)
if rpc.get("method") == "tools/call":
needed = TOOL_SCOPES.get((rpc.get("params") or {}).get("name"))
except Exception:
pass

if needed and needed not in token_scopes(dict(scope.get("headers") or [])):
challenge = (
f'Bearer error="insufficient_scope", scope="{needed}", '
f'resource_metadata="{RESOURCE_METADATA}", '
f'error_description="This operation requires the {needed} scope"'
)
await send({"type": "http.response.start", "status": 403,
"headers": [(b"content-type", b"application/json"),
(b"www-authenticate", challenge.encode())]})
await send({"type": "http.response.body",
"body": json.dumps({"error": "insufficient_scope",
"scope": needed}).encode()})
return

# Replay the buffered body downstream.
replayed = False
async def replay():
nonlocal replayed
if not replayed:
replayed = True
return {"type": "http.request", "body": body, "more_body": False}
return await receive()

await self.app(scope, replay, send)

app = ScopeChallengeMiddleware(mcp.http_app(stateless_http=True))

Same request, against :8772:
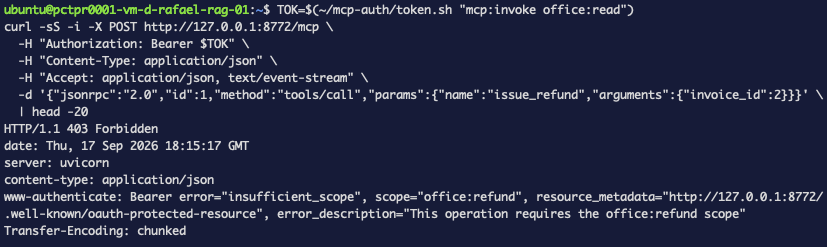
The middleware returns 403 with a WWW-Authenticate challenge naming the missing scope

HTTP/1.1 403 Forbidden
www-authenticate: Bearer error="insufficient_scope", scope="office:refund",
resource_metadata="http://127.0.0.1:8772/.well-known/oauth-protected-resource",
error_description="This operation requires the office:refund scope"

Now a client has something to act on: the status says refused, scope= says what to ask for, and resource_metadata says where to look up how. That is step-up authorization as a protocol rather than as a log message.

Step 5 — What it cost​

The middleware works. It is also worse code than the decorator, in three specific ways, and pretending otherwise would be dishonest.

It does not know what a tool is. ASGI middleware sees bytes and headers. To find out which tool is being called it parses the JSON-RPC envelope itself and looks the name up in a table it has to maintain:

TOOL_SCOPES = {
"find_customer": "office:read",
"open_invoices": "office:read",
"issue_refund": "office:refund",
}

That table is a second source of truth. Add a tool and forget the entry and it is unprotected — silently, because the middleware just passes through anything it does not recognise. The decorator could not have that bug: the requirement sat on the function.

It decodes the token unverified. The middleware runs upstream of the verifier, so the verified claims do not exist yet. It splits the JWT and base64-decodes the payload without checking the signature:

payload = auth.split(None, 1)[1].split(".")[1]
claims = json.loads(base64.urlsafe_b64decode(payload + "=" * (-len(payload) % 4)))

This is not the hole it looks like — the verifier still runs downstream and still rejects a forged token, so nothing reaches a tool on a bad signature. But the scope decision is made on unauthenticated bytes, and the only reason that is survivable is the second check behind it. It is a wart, not a vulnerability, and it is the kind of thing worth writing down before someone later removes the "redundant" verifier.

It buffers every request body. To read the envelope and still pass it downstream, the middleware drains receive() into memory and replays it. Fine for JSON-RPC calls; think harder before putting this in front of large uploads.

Troubleshooting — the errors this run actually produced​

insufficient_scope on a tool you did grant​

Check the token, not the server:

~/mcp-auth/token.sh "mcp:invoke office:refund" | cut -d. -f2 | base64 -d 2>/dev/null | jq .scope

If office:refund is missing, the scope exists as a Property Mapping but was never moved into the provider's Selected Scopes. Authentik silently drops scopes a client is not permitted to request rather than erroring, so the token comes back valid and short.

The middleware never fires​

It only inspects POST. MCP clients open a GET for the event stream first, and that request carries no JSON-RPC envelope — if you are watching the wrong request you will conclude the middleware is dead. Confirm with the curl above, which is a single POST.

Every tool suddenly returns 403​

TOOL_SCOPES is keyed by the tool's registered name, which is the function name, not the decorated label. Rename a function and the table stops matching. The pass-through case is the dangerous direction (unprotected), but a typo in the table produces this one.

The 403 body is empty in some clients​

The challenge lives in the WWW-Authenticate header. Clients that only log response bodies will show you {"error":"insufficient_scope"} and nothing about which scope. Use curl -i.

What this did and didn't buy you​

It bought genuine per-tool authorisation: two tokens that differ by one scope, each able to run exactly one of two tools, proven at the HTTP layer rather than asserted. And with the middleware, a refusal a client can programmatically recover from.

It did not buy a clean design. Both implementations are compromises pointing opposite ways:

tool decorator (:8771)ASGI middleware (:8772)
Scope requirement liveson the functionin a separate table
Reads verified claimsyesno — decodes unverified, verifier runs after
RefusalHTTP 200, isError: trueHTTP 403 + WWW-Authenticate
Client can step upnoyes
New tool unprotected by defaultnoyes

The honest summary is that the correct protocol behaviour requires leaving the abstraction the framework gives you, and the ergonomic version cannot produce it. If your clients do not implement step-up — and most agent clients today do not — the decorator is the better trade. If they do, you pay for it with a table you must remember to update.

It also did not buy authorisation that survives the tool doing something else. issue_refund is gated on office:refund; nothing stops a future find_customer from being edited to write. Scopes gate entry, not behaviour — which is the same boundary part 4 drew around policy-in-the-tool.

What's next​

The obvious remaining gap is that both versions trust the token's scope list and nothing else. Neither asks who the caller is or what they are acting on — a token with office:refund refunds any invoice, for any customer, for any amount. That is object-level authorisation, and it does not live in OAuth scopes at all.

Finished this tutorial?
Mark it complete to earn A scope per tool, and a refusal clients can act on on your skill path.

Further reading​

intermediatePart 9

Sandbox the code your agent writes, and prove every limit actually applied

· 11 min read
Rafael Fernandes
NLP Engineer & Tech Writer at WiLine
Share:
+

Every agent tutorial in this series so far has given a model tools — functions you wrote, with arguments you defined. This post is about the other thing agents do, which is write code and then run it.

That is a different risk, and the difference is worth being precise about. A tool call is the model choosing from a menu you control. Executing generated code is the model handing you something nobody has ever read, which you then run on your machine.

intermediatePart 8

Move the Docker daemon off root so a container escape lands on an ordinary user

· 14 min read
Rafael Fernandes
NLP Engineer & Tech Writer at WiLine
Share:
+

Here is the part nobody says out loud when they tell you to add yourself to the docker group so you can stop typing sudo.

That group is root. Not "close to root", not "root for Docker things". If you can run a container, you can read, change or delete any file on the machine — including the password file, including other people's home directories, including the files the administrator deliberately kept away from you.

No exploit required. It is one command, and it takes about four seconds.

intermediatePart 7

Firewall an agent container so it can reach one API and nothing else

· 21 min read
Rafael Fernandes
NLP Engineer & Tech Writer at WiLine
Share:
+

Agent orchestration part 4 split a toolbox so the scheduler could not issue refunds. Part 5 gave the agent an identity at the gateway. Part 6 put a JWT verifier in front of the tools server so it refuses anonymous callers.

Every one of those controls what the agent may call. Not one of them controls where the agent may go.

That distinction is the whole of this post. Exfiltration does not need a tool. It needs a socket.

intermediatePart 6

The wrong valid token: authenticating an MCP tools server with authentik

· 16 min read
Rafael Fernandes
NLP Engineer & Tech Writer at WiLine
Share:
authentik+Model Context Protocol

Part 5 gave an agent its own identity at the gateway: a token issued by authentik over client credentials, carrying a scope, expiring in five minutes. It ended by naming what it had not covered — the MCP tools server from agent orchestration part 4 still trusts anything that can reach its port, issue_refund included.

That post was explicit about the limit of what it had built:

The MCP server still trusts everyone. Scoping happens in the client. Anything that can reach 127.0.0.1:8770 can call issue_refund directly, agent or not.

Splitting the toolbox per role stopped an agent from reaching a tool it shouldn't. It did nothing about a curl. This part closes that.

intermediatePart 4

Split one MCP toolbox between two agents so the scheduler cannot issue refunds

· 13 min read
Rafael Fernandes
NLP Engineer & Tech Writer at WiLine
Share:
Model Context Protocol++LiteLLM
0/4
🎯 Skill path0/4 earned
Agent orchestration with LangGraph

Part 3 gave an agent five tools over MCP — a calendar, a customer list, invoices, and a refund — and put a human in front of the refund. It ended by admitting the obvious: one agent held all five. Nothing stopped the model reaching for issue_refund when it had been asked to book an appointment. The human pause was the only thing in the way, and a pause only fires if the model calls the tool at all.

This part removes the tool instead. The scheduler gets three tools and the billing agent gets three, sharing one. Ask the scheduler to refund an invoice and it cannot — not because it was told not to, not because a policy blocked it, but because issue_refund was never in the list it was given.

Then Part 2's supervisor goes back on top, and the interesting property falls out: routing decides who works, scoping decides what is possible. A misrouted refund still cannot refund.

intermediatePart 3

Book appointments and refund invoices from a LangGraph agent over MCP

· 20 min read
Rafael Fernandes
NLP Engineer & Tech Writer at WiLine
Share:
Model Context Protocol++LiteLLM
0/4
🎯 Skill path0/4 earned
Agent orchestration with LangGraph

Part 1 gave an agent state that survives a restart, and a pause where a human approves before it continues. Part 2 put a supervisor in front of a scheduler and a billing agent and routed work between them.

Neither of those agents scheduled or billed anything. They discussed it. Every tool they had was a function you wrote into the same process, and the interesting ones — look up a customer, take a slot, move money — didn't exist.

This part builds the toolbox those two roles need, over MCP: a calendar, a customer list, invoices, and a refund. To keep the moving parts down we point one agent at all five tools rather than rebuilding Part 2's supervisor — the agent discovers them at runtime instead of being wired to them, chains them to answer a question, and writes rows you can go and check in the database afterwards. Then the refund stops it dead and makes a human type the amount.

Splitting these tools back across the scheduler and the billing agent — so the scheduler cannot see issue_refund at all — is the natural next step, and the last section says how.

In July the MCP specification dropped sessions entirely. On the day we ran this, LangChain shipped support for that revision in the main package. So this is a first run against a five-week-old protocol and a same-day client — which is why three things in here aren't in anyone's documentation yet.

intermediatePart 3

One login for everything: putting authentik in front of a self-hosted app

· 20 min read
Rafael Fernandes
NLP Engineer & Tech Writer at WiLine
Share:
authentik+

Part 1 closed the ports nobody meant to open. Part 2 stopped two containers from running as root. Both were about the machine. Neither touched the question a self-hosted AI stack answers worst: who is allowed to log in, and where is that decided?

Same box as before. The Langfuse we've been hardening since Part 1 — the one whose Postgres, ClickHouse and Redis Part 1 found correctly bound to localhost, and whose worker Part 2 dropped off root — was deployed back in Catch what your tests miss. Two parts have now secured the machine underneath it without once touching the application's own front door. This is the first part that changes Langfuse itself.

Right now that decision is made in each app, separately. Langfuse has its own email-and- password table. So does every other tool on the box. Each one is a place where an account can outlive the person who owned it, where a password can be reused, and where "remove this person's access" means remembering that the app exists at all.

This post moves that decision to one place. That place is authentik — an open-source identity provider you run yourself, the self-hosted counterpart to Okta or Auth0. It holds the accounts, runs the login screen, and vouches for who someone is to any app that asks. Apps stop storing passwords and start asking authentik.

It's the same job Keycloak does, and Keycloak is the better-known name. authentik earns the pick here on setup cost: a compose file and a wizard against Keycloak's realms, clients and JVM tuning. For one box and one app, that difference is the whole decision.

We deploy it, connect Langfuse to it over OIDC, and end with a login that goes through authentik and back.

intermediatePart 2

Hand work between LangGraph agents without corrupting shared state

· 16 min read
Rafael Fernandes
NLP Engineer & Tech Writer at WiLine
Share:
+PostgreSQL+
0/4
🎯 Skill path0/4 earned
Agent orchestration with LangGraph

You have two agents. One books appointments. One handles billing.

A ticket arrives that needs both: reschedule my install, and my bill looks wrong. So you send it to both.

The first one books Tuesday. The second one sees the account is past due and freezes it. Both finish at almost the same moment, and both save what they decided.

Only one of them is saved. Which one? Whichever finished first — which comes down to how slow an API call was that day. So you book an appointment on a frozen account, or freeze an account you just promised an engineer to. Afterwards it looks like one clean decision was made.

Part 1 built one agent that runs its steps in a fixed order. This post has several: a supervisor that picks who works on what, an agent that passes the job to another one halfway through, and two agents put in each other's way on purpose — to find out what LangGraph does when they disagree.

intermediatePart 1

Checkpoint a LangGraph agent on a WEC Instance so crashes cost you nothing

· 20 min read
Rafael Fernandes
NLP Engineer & Tech Writer at WiLine
Share:
+PostgreSQL+
0/4
🎯 Skill path0/4 earned
Agent orchestration with LangGraph

Your agent has been working on a customer's request for forty seconds. It has read the ticket, pulled the account, and checked three engineers' calendars. It is about to book the appointment.

Then the process dies. A deploy going out, the host running out of memory, someone restarting the container — it does not matter which.

The agent does not pick up where it left off, because there is nothing to pick up from. Everything it learned lived in variables inside a process that no longer exists. The customer is still waiting. Run it again and you pay for all that work a second time. And the part that should worry you most: nobody can say whether the appointment was booked in the last second before it died.

An agent is a model in a loop. As an ordinary Python script, that loop is exactly as fragile as the process holding it.

Here we build one that saves its state to Postgres after every step, so a crash costs nothing.

intermediatePart 3

Mask PII at the gateway: set up Presidio, plus the one line the docs leave out

· 21 min read
Rafael Fernandes
NLP Engineer & Tech Writer at WiLine
Share:
LiteLLM+Presidio+
0/5
🎯 Skill path0/5 earned
Self-hosting an LLM gateway

Part 2 ended with the gateway deciding which model answers each request — and still forwarding every prompt verbatim, including the ones carrying customer names, emails and phone numbers.

This post puts a PII filter in that path. Not in front of the model, though: in front of the logs. The model reading your prompt is doing its job; the risk is what gets stored. So the raw text goes to the model and a masked copy goes to your logging.

That is what the gateway advertises. Following its documented configuration got me the opposite — a model that answered correctly and a reply that came back as <LOCATION>. This is how to find that and how to fix it.

intermediatePart 2

LiteLLM complexity routing: the right model for each request, and what it costs in latency

· 12 min read
Rafael Fernandes
NLP Engineer & Tech Writer at WiLine
Share:
LiteLLM+Qwen+
0/5
🎯 Skill path0/5 earned
Self-hosting an LLM gateway

Part 1 ended on an uncomfortable number. The same three-word answer cost 3 tokens from a small model and 200 from a reasoning model — which spent all 200 thinking and returned nothing at all.

Every request your apps send picks a model, and mostly that choice is made once, hardcoded, and never revisited. This post puts the gateway in charge of it instead: classify the request, route it to a model sized for the work. Then it measures what that decision costs, because it is not free and most write-ups skip that part.

intermediatePart 1

One endpoint, many models: deploy an LLM gateway on a WEC Instance

· 16 min read
Rafael Fernandes
NLP Engineer & Tech Writer at WiLine
Share:
+LiteLLM+
0/5
🎯 Skill path0/5 earned
Self-hosting an LLM gateway

Here's how it usually goes. One app needs a model, so you paste the API key into its .env. Then a second app needs one. Then a script. Six months later the same key is in five places, nobody remembers which of them is still running, and you can't rotate it without breaking something you'll only find out about when it breaks.

A gateway is the boring fix. One endpoint in front of every model, one place that holds the real credential, and a scoped key per app that you can revoke on its own. This post deploys one on a WEC Instance and points it at the WEC Inference API.

intermediatePart 2

Root by default: hardening container privilege on a self-hosted AI stack

· 8 min read
Rafael Fernandes
NLP Engineer & Tech Writer at WiLine
Share:
+

Part 1 of this series audited a live multi-agent box and found every network-exposure question worth asking. One line from that audit didn't get followed up: "the Postgres, ClickHouse and Redis behind Langfuse were published to 127.0.0.1 instead of the world — someone made a good decision there. Hold that thought."

Here's the other half of that thought: getting the network right says nothing about what happens after someone's already inside a container. If the process running in there is root, a compromise starts with the keys to the whole filesystem. So we checked — on the same box, the same Langfuse stack Part 1 already praised — whether "network correct" also meant "privilege correct." It didn't, for two of the six containers. Here's what fixing that actually looked like, including the part that broke.

intermediatePart 1

Your firewall is lying to you: hardening Docker networks for multi-agent systems

· 15 min read
Rafael Fernandes
NLP Engineer & Tech Writer at WiLine
Share:
+

You start with one agent. Then it needs a database. Then you add a second agent, a messaging bridge, an observability stack. Six months later a single WEC Instance is running five compose projects, twenty-something containers, and nobody remembers which ports are open to the world.

That's not a hypothetical — that's the box this tutorial was written on. So instead of theorizing, we probed it: can containers reach each other across stacks? Can they reach the databases? Is the firewall actually protecting anything?

Three of the answers surprised me. One of them was a database sitting there with no password. And the firewall — the firewall was lying.

beginnerPart 2

Migrate OpenClaw's Telegram Bot to Hermes

· 5 min read
Rafael Fernandes
NLP Engineer & Tech Writer at WiLine
Share:
Hermes Agent+
0/2
🎯 Skill path0/2 earned
Self-hosting Hermes

In Part 1 you self-hosted Hermes with persistent memory. This part connects it to the same Telegram bot from the OpenClaw series — the chat your users already know keeps working exactly as it did, just a different agent answering underneath. No new bot to announce, no channel to migrate people to.

intermediatePart 1

Build a WhatsApp AI assistant from scratch with Evolution and the WEC API

· 15 min read
Rafael Fernandes
NLP Engineer & Tech Writer at WiLine
Share:
WhatsApp++Evolution
0/2
🎯 Skill path0/2 earned
WhatsApp automation on WEC
  • 1Self-host a WhatsApp AI bridge
  • 🏆Production delivery via Cloud API

Most "self-host a WhatsApp AI" guides stop at "the container started." This one goes all the way: you deploy a real, programmable WhatsApp gateway (Evolution API), then write the bridge yourself — the ~50 lines that turn an incoming message into an LLM answer and send it back. That bridge (webhook → model → reply) is the reusable pattern behind every chat-AI integration: SMS, Slack, Telegram, voice — swap the channel, the shape is identical.

And because this is a real build, we hit — and fix — every gotcha: an image that moved publishers, a Baileys version loop, an infinite reply loop, group-chat spam, WhatsApp's new LID addressing, and a genuine delivery wall that most tutorials pretend doesn't exist. Every command, error, and output below is from an actual run.

beginnerPart 6

Add a WhatsApp channel to OpenClaw

· 6 min read
Rafael Fernandes
NLP Engineer & Tech Writer at WiLine
Share:
OpenClaw+WhatsApp
0/6
🎯 Skill path0/6 earned
Self-hosting OpenClaw

Telegram (Part 3) gave your agent a bot. WhatsApp gives it a phone line — the app ~3 billion people already use, reachable with zero friction. One catch worth understanding up front: WhatsApp has no bot account, so OpenClaw links to a real number as a companion device (like WhatsApp Web) and the agent acts as that account. Every command and error below is from a real run.

advancedPart 4

Catch what your tests miss: observe and score your WEC app in production with Langfuse

· 18 min read
Rafael Fernandes
NLP Engineer & Tech Writer at WiLine
Share:
+
0/8
🎯 Skill path0/8 earned
AI evals & observability

A customer says your support bot promised them a refund policy that doesn't exist. Your feature made two LLM calls — classify, then reply. Which one invented it? If you can't answer that, your app is a black box — and this guide fixes exactly that.

You can now prove a model works (part 1), make its output machine-reliable (part 2), and generate a real test set to check it against (part 3). But all of that runs offline, in CI, on inputs you chose. Production doesn't play along.

This guide closes the gap. We'll self-host Langfuse — the open-source, self-hostable alternative to LangSmith — trace every real call, auto-score live traffic with an LLM judge, drill into the exact step that breaks, and feed failures back so your part-3 dataset gets stronger. Offline eval tells you it worked on your test set; this tells you it works in the wild.

beginnerPart 5

Run OpenClaw on WEC Models

· 7 min read
Rafael Fernandes
NLP Engineer & Tech Writer at WiLine
Share:
0/6
🎯 Skill path0/6 earned
Self-hosting OpenClaw
OpenClaw+

Through Parts 1–4 you deployed OpenClaw, secured it with HTTPS, added Telegram, and made it private over a NetBird mesh — all pointed at OpenAI. This part swaps the model out from under it: point the same agent at WEC Models — WiLine's own OpenAI-compatible inference — and run it on an open-weight model, Llama 3.1 8B Instruct. Same box, no rebuild — just a base-URL, key, and model change via the OpenClaw CLI.

intermediatePart 1

Self-host the Hermes Agent with persistent memory

· 14 min read
Rafael Fernandes
NLP Engineer & Tech Writer at WiLine
Share:
Hermes Agent+SQLite
0/2
🎯 Skill path0/2 earned
Self-hosting Hermes

Hermes Agent is Nous Research's open-source (MIT) AI agent — "the agent that grows with you." Its standout feature is persistent memory: it learns your projects and doesn't forget across restarts. This guide deploys it on the same WEC Instance you already use for OpenClaw, points it at a model, and proves the memory survives a full reboot.

intermediatePart 4

Make OpenClaw private with a NetBird mesh VPN

· 18 min read
Rafael Fernandes
NLP Engineer & Tech Writer at WiLine
Share:
OpenClaw+NetBird
0/6
🎯 Skill path0/6 earned
Self-hosting OpenClaw

In Article 2 we put Caddy in front of OpenClaw for HTTPS, and in Article 3 we added a Telegram channel. The gateway works — but Caddy is still listening on 0.0.0.0, reachable by anything that can route to the box. This is the capstone of the series: we join the server and your laptop to a NetBird mesh, repoint openclaw.local at the mesh IP, and close the public ports. The same https://openclaw.local/chat URL keeps working — but only for your devices. Every command and error below is from the actual run.

beginnerPart 3

Add a Telegram channel to OpenClaw

· 6 min read
Rafael Fernandes
NLP Engineer & Tech Writer at WiLine
Share:
OpenClaw+
0/6
🎯 Skill path0/6 earned
Self-hosting OpenClaw

You've deployed OpenClaw and secured it behind HTTPS. Now make it usable — talk to your agent from your phone via Telegram. We create a bot, connect it, clear OpenClaw's pairing gate, and get a real reply. Every command and gotcha below is from an actual run.

intermediatePart 2

Secure OpenClaw with a Caddy reverse proxy + HTTPS

· 9 min read
Rafael Fernandes
NLP Engineer & Tech Writer at WiLine
Share:
OpenClaw+
0/6
🎯 Skill path0/6 earned
Self-hosting OpenClaw

In Article 1 we got OpenClaw running — but only over plain HTTP, with an allowInsecureAuth workaround. Here we put Caddy in front of it as a reverse proxy: real HTTPS, device-paired auth, and the gateway's raw ports closed so the proxy is the only way in. Every command and error below is from the actual deploy.

beginnerPart 1

Deploy OpenClaw on a WEC Instance via Docker Compose

· 12 min read
Rafael Fernandes
NLP Engineer & Tech Writer at WiLine
Share:
OpenClaw++
0/6
🎯 Skill path0/6 earned
Self-hosting OpenClaw

Your AI assistant doesn't have to live in someone else's cloud.

Deploy a self-hosted OpenClaw AI agent on a WEC Instance with Docker Compose — from spinning up the VM to an agent that actually answers, using your own model API key. Every command, version, and error below was captured from a real deployment on a WEC Instance.